
Have you ever typed something in Word, hit save, and then thought, “Wait… did that sentence even make sense?” Don’t worry, we’ve all been there. Writing feels easy until those sneaky grammar mistakes or awkward sentences pop up and leave us second-guessing ourselves. That’s exactly where Grammarly swoops in like your personal writing buddy.
When you add Grammarly to Microsoft Word, it doesn’t just underline spelling mistakes; it’s way smarter than that. It checks your grammar in real time, helps you cut out fluff, and even suggests tweaks to make your tone sound more natural.
Whether you’re working on a college paper, drafting an important proposal, or just trying to make that email sound less robotic, Grammarly makes sure your words hit the right note. Pretty handy, right?
Here’s something you should know upfront (and this catches a lot of people off guard): you won’t find Grammarly inside Word’s Office Add-ins store. Nope, that little trick doesn’t work. The real magic happens when you install Grammarly for Windows or Grammarly for Mac. Once you do, it plugs right into Word, and boom, you’ve got Grammarly’s suggestions running alongside your document.
So if you’ve been wondering, “How do I actually get Grammarly into Word without pulling my hair out?” stick around. The setup is simpler than you think, and once it’s done, you’ll wonder how you ever wrote without it.
Before You Start (Requirements)
Okay, before we rush into adding Grammarly to Word, let’s pause for a second and make sure we’ve got all the right tools in place. Think of it like checking your backpack before heading out, because who wants to realize halfway through that you forgot your lunch, right?
1. A Grammarly account
Do you already have a Grammarly account? If yes, awesome!!! You’re ahead of the game. If not, don’t worry; setting one up takes just a minute. The good news is that both the free and premium versions work with Word.
Personally, I love that even the free version catches those silly typos and grammar slips. But if you’re someone who writes a lot essays, reports, and blogs, then the Premium plan really feels like having a writing coach sitting next to you.
Related Content: Is Grammarly Safe?
2. Compatible OS & Word versions
Here’s the slightly “techy” part (but important!): Grammarly works best if you’re on Windows 10 or 11, or macOS 10.15 (Catalina) and up. On the Word side, you’ll need Microsoft 365 or Word 2019 or newer. If you’re rocking an older version of Word, you might run into hiccups. And trust me, nothing’s more frustrating than installing everything only to see it won’t launch.
3. A special note for Mac users
Mac friends, this one’s for you: that old “Grammarly for Microsoft Word on Mac” add-in? Yeah, it’s officially retired. (RIP little guy.) The replacement is much better, though, just grab the Grammarly for Mac desktop app. It connects with Word and actually gives you smoother performance.
Got all three boxes ticked? Perfect. Now we’re ready to roll up our sleeves and bring Grammarly into Word without any last-minute surprises.
Related content: Grammarly Review
How to Add Grammarly to Word on Windows
Step 1: Sign in to Grammarly on the web.

First things first, you’ll need a Grammarly account. Don’t have one yet? No worries, it’s free to get started.
- Head to Grammarly’s website
- You can sign up instantly with your Google account by clicking “Sign up with Google.”
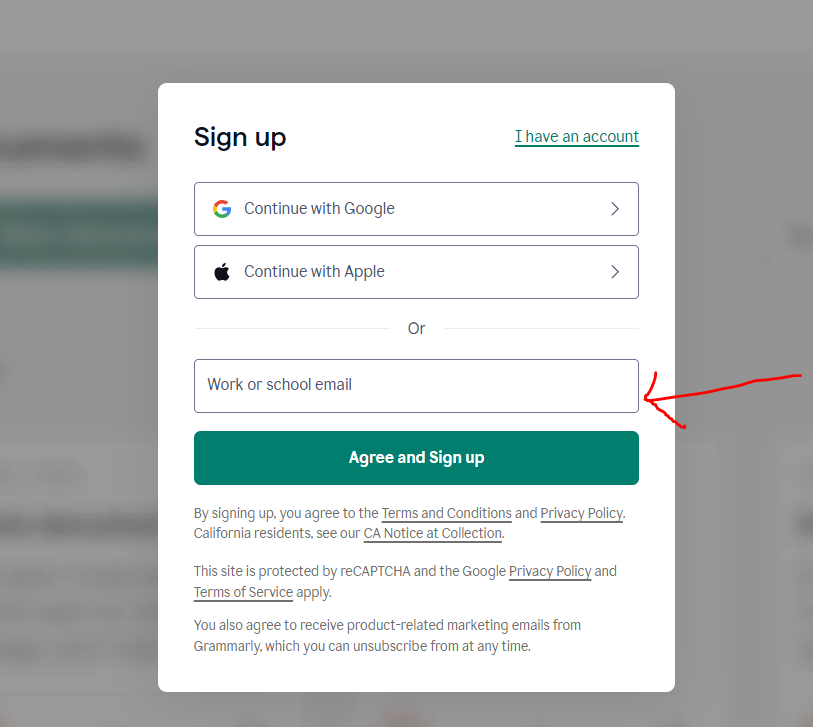
Or, click “Get Grammarly It’s Free” and register with your work or school email address.
Once you’re signed in, you’re ready to grab the app that makes Grammarly work directly inside Word.
Step 2: Go to the Apps page and choose Grammarly for Windows.
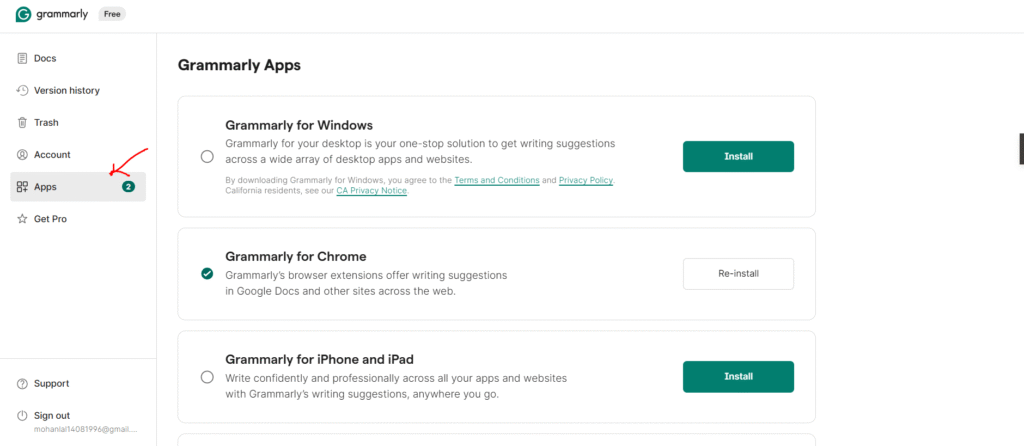
After logging in, look at the left-hand menu and click on “Apps.” This is where Grammarly offers desktop apps for different platforms.
- Find the option labeled “Grammarly for Windows.”
- This is the app you need; it’s what integrates Grammarly into Microsoft Word (and Outlook too).
Step 3: Download the installer.
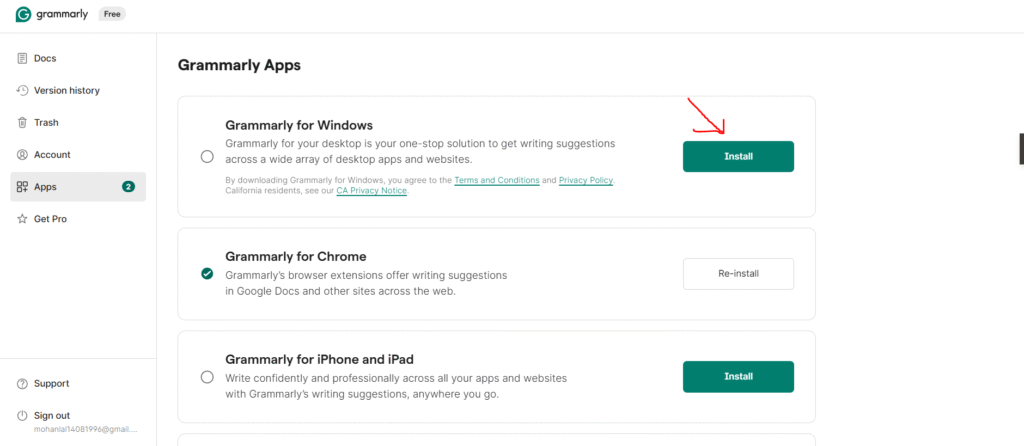
Click the Download button and save the setup file on your computer. This small file is the bridge between Grammarly and your desktop apps like Word and Outlook.
Related content: How to Add Grammarly to Google Docs?
Step 4: Run the installer and complete setup.
Locate the downloaded file and double-click it. Follow the on-screen instructions to complete the installation. It usually takes less than two minutes, super quick.
- Just click “Install” and let the setup do its thing.

After installation, Grammarly might ask you to log in again. If you see a “Sign in to existing account” button, click it; it’ll open your browser, fetch your login details, and connect automatically.
Tip: In some cases, Word won’t ask you to log in later because you’ve already done it here in Step 4. That’s normal, so don’t be surprised if your experience is slightly different.
Step 5: Open Microsoft Word & sign in inside Word (if prompted).
Now, open Microsoft Word. You should see a Grammarly sidebar appear on the right side of your screen.
- The first time, it might take a few seconds to load.
- If Word asks you to log in again, use the same email and password you signed in with earlier.
In many cases (like mine), the login happens back in Step 4—so when you open Word, Grammarly is already ready to roll.
Related content: Is QuillBot Detectable?
Step 6: Explore Grammarly’s suggestions.
Here’s the fun part: start typing! Grammarly will instantly scan your text and highlight mistakes as you go.
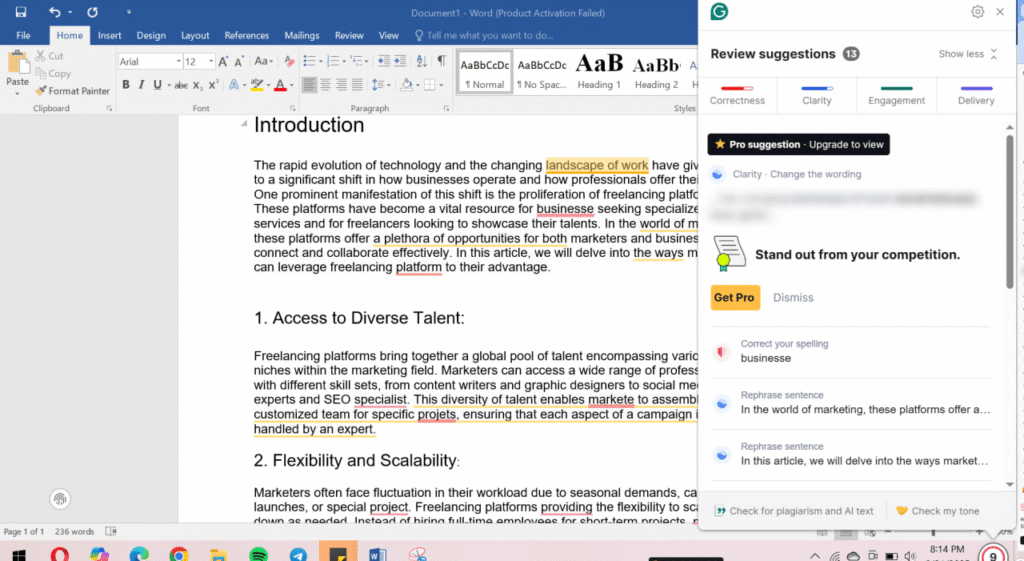
For example, when I typed a few sample lines to test it, Grammarly spotted nine mistakes within seconds and showed me suggestions on the right-hand panel.
- Errors are underlined directly in your Word document.
- The sidebar explains what’s wrong and how to fix it.
- You can toggle categories like Correctness, Clarity, Engagement, and Tone depending on what matters most to you.
My tip: This installation doesn’t just improve Word; it also integrates with Outlook for emails. And if you keep Grammarly for Windows running in the background, it works in apps like WhatsApp Desktop and Telegram, too. That means polished writing across both your professional documents and everyday chats.
How to Verify if Grammarly Is Working or Not in Word?
It only takes a few seconds to confirm everything’s running smoothly:
- Look for the Grammarly panel on the right-hand side of Word.
- Type a quick test sentence like “This is a mistake” and check if Grammarly suggests corrections in real time.
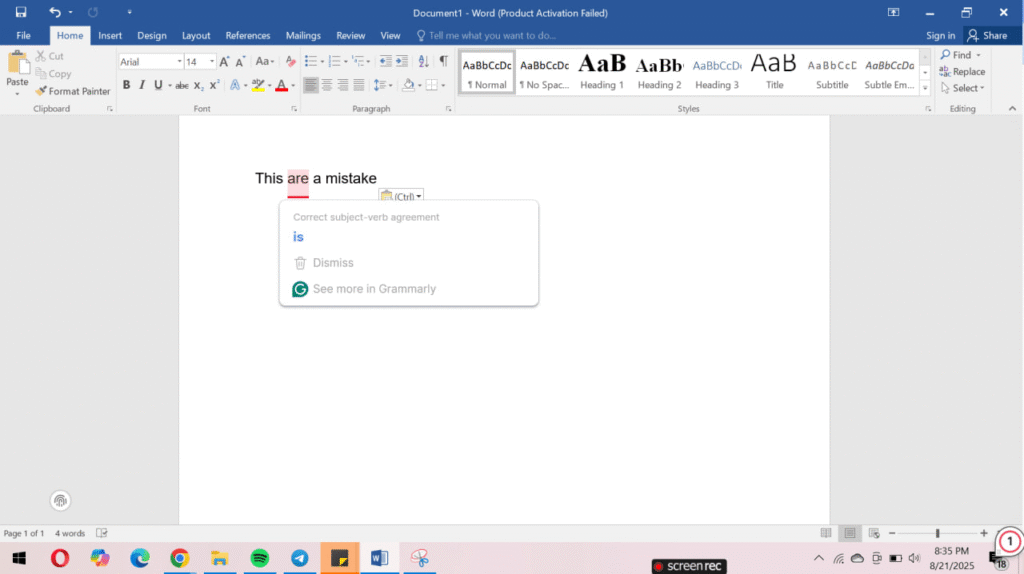
If the panel doesn’t appear, simply close Word and reopen it. Still not showing? Double-check that you installed Grammarly for Windows (not from Word’s Add-ins store) and that your version of Microsoft Office is up to date.
How to Get Grammarly on Microsoft Word?
If you spend a lot of time writing in Microsoft Word, you already know how easy it is to make small grammar mistakes or misspellings. That’s where Grammarly comes in. The best part? Adding Grammarly to Word on Windows is super simple, and once you do it, you’ll wonder how you ever worked without it.
Let me walk you through the easiest ways to get Grammarly working inside Microsoft Word.
Method 1: Add Grammarly Directly to Microsoft Word
This is the most common way to bring Grammarly into Word.
- Head over to Grammarly’s official website and download the Grammarly for Microsoft Office installer.
- Once the file is downloaded, run the setup.
- During installation, select Grammarly for Word (you can also tick Outlook if you want Grammarly there too).
- Finish the setup, then open Microsoft Word.
- You’ll now see a brand-new Grammarly tab at the top of Word. Log in to your Grammarly account, and you’re good to go.
From here, Grammarly works quietly in the background, catching grammar, punctuation, and style issues in real time. Just click on the underlined suggestions and decide whether you want to accept or ignore them; it’s that easy.
Method 2: Use the Grammarly for Windows App with Word
Not a fan of add-ins? No worries, you can still use Grammarly with Word using the desktop app.
- Download and install the Grammarly for Windows app.
- Sign in with your Grammarly account.
- Keep your Word document open while also opening the Grammarly app.
- Copy your text from Word, paste it into Grammarly, and let it do the magic. Once you’re happy with the corrections, paste it back into Word.
This method gives you a clean editing environment with Grammarly’s full power while still keeping your original work in Word.
Why You’ll Love Grammarly in Word
Free Version: Fix grammar, spelling, and basic punctuation.
Premium Version: Go beyond the basics with tone detection, word choice suggestions, clarity rewrites, and even advanced style improvements.
With Grammarly inside Word, you don’t just write; you write with confidence. Whether you’re polishing up an essay, preparing a client report, or simply drafting a personal letter, Grammarly makes sure your writing comes out professional, clear, and impactful every single time.
How to Add Grammarly to Word on Mac
If you’re a Mac user who loves writing crisp, error-free documents, you’ll be happy to know that Grammarly plays really well with Word on macOS. Adding it isn’t rocket science; you just need to follow a few simple steps. Let’s walk through it together.
Related content: QuillBot AI Review
Step 1: Download Grammarly for Mac
Head over to the official Grammarly website and download the Grammarly app for Mac. Don’t worry, it’s free to get started, and the installation is as smooth as butter.
Step 2: Install the App
Once the file is downloaded, open it and drag the Grammarly icon into your Applications folder (just like any other Mac app).
Step 3: Sign In to Grammarly
Launch the app and sign in with your Grammarly account. If you don’t have one yet, you can create it in seconds using your email, Google, or Apple ID.
Step 4: Enable Grammarly for Word on Mac
Here’s the magic part:
- Open Microsoft Word.
- Go to the Insert tab.
- Click on Add-ins, then search for Grammarly for Microsoft Word.
- Hit Add, and boom, it’s connected!
Now Grammarly will start suggesting improvements directly inside Word while you type.
Step 5: Start Writing Smarter
That’s it! Open any Word document, and Grammarly will check your grammar, spelling, style, and tone in real time. You can accept or dismiss suggestions with just one click.
My tip: If you’re working offline and don’t want Grammarly to run, you can easily disable it from the toolbar without uninstalling it completely.
Related content: What is QuillBot?
How to Use Grammarly Effectively in Word
If you’ve installed Grammarly in Microsoft Word, you’re already one step ahead in polishing your writing. But here’s the truth: most people only scratch the surface of what Grammarly can actually do.
To really maximize its effectiveness, you need to know the little tricks and settings that make a big difference. Let’s dive into some tips that will help you get the absolute best out of Grammarly in Word.
1. Customize Your Goals Before Writing
One of my favorite things about Grammarly is that it doesn’t take a “one-size-fits-all” approach. Before you start editing, set your goals. You can tell Grammarly whether your tone should be formal, casual, or somewhere in between. You can even pick if your audience is general or expert-level. This way, Grammarly gives you suggestions that actually fit the context of your document.
My Suggestion: If you’re writing a professional report, set the tone to “formal” and the audience to “knowledgeable.” If you’re crafting a blog post, switch to “casual” with a general audience.
2. Don’t Accept Every Suggestion Blindly
Yes, Grammarly is smart. But no AI tool fully understands your voice and style. Some of its suggestions might make your writing sound robotic or overly simplified. Instead of clicking “accept” on every change, pause and see if the suggestion actually makes sense. Sometimes keeping your original sentence adds more personality and impact.
Related content: Grammarly vs. ProWritingAid
3. Use Grammarly’s Clarity and Conciseness Suggestions
Have you ever written a sentence that feels… way too long? Grammarly’s “Clarity” and “Conciseness” checks are a lifesaver here. They highlight sentences that drag on and help you cut the fluff. The result? Your writing becomes sharper, easier to read, and more professional.
4. Explore Synonyms for Variety
We all have those favorite words we use on repeat (guilty!!!). Grammarly can suggest synonyms so you don’t sound repetitive. Next time it underlines a word, click on the suggestion box; you might find a fresher word that makes your writing pop.
5. Take Advantage of the Plagiarism Checker
If you’re a student, researcher, or blogger, Grammarly’s plagiarism checker is a game-changer. It scans billions of web pages to ensure your content is original. Even if you didn’t intentionally copy, it’s a great way to avoid unintentional overlaps with online content.
Related content: QuillBot AI Checker
6. Adjust Your Language Preferences
If you write in American English for work but switch to British English for school or clients, Grammarly makes it super easy to switch language styles. No more confusing “color” vs. “colour” debates.
7. Use Grammarly as a Learning Tool
Here’s a hidden gem: instead of just fixing mistakes, actually learn from them. Grammarly explains why something is incorrect. Over time, this helps you improve your grammar and writing skills, so you’ll rely less on the tool and more on your own sharp writing instincts.
Why isn’t Grammarly showing up in Word?
So, you finally installed Grammarly for Microsoft Word, sat down with your cup of coffee, ready to let the grammar magic happen… and boom! The Grammarly tab is nowhere to be found. Frustrating, right? Don’t worry, I’ve been there too. Let’s figure this out together and get you back to error-free writing.
1. Is Your Microsoft Office Version Compatible?
First things first: Grammarly doesn’t play nicely with all versions of Microsoft Office. If you’re using Office 2016 or later on Windows, you’re good to go. But if you’re on an older version like Office 2010, you may run into issues.
Quick Fix Suggestion: Update your Microsoft Office to the latest version. It not only helps with Grammarly but also keeps Word running faster and safer.
Related content: QuillBot Plagiarism Checker
2. Did Grammarly Install Correctly?
Sometimes, Word just acts moody. Even if Grammarly says it installed successfully, the add-in might not have been enabled properly.
What you can do:
- Open Word > Options > Add-ins.
- Check if Grammarly is listed under “Inactive Add-ins.”
- If yes, enable it, restart Word, and see if the tab appears.
It’s like telling Word, “Hey, let Grammarly sit at the cool kids’ table too.”
3. Are Add-ins Disabled in Word?
Here’s a sneaky one: Word sometimes disables add-ins if they crash or slow things down. That means Grammarly might be sitting in the “disabled” list without you even realizing it.
Quick Fix Suggestion:
- Open Microsoft Word.
- Go to File > Options > Add-ins.
- Look for Grammarly in the “Disabled Application Add-ins” list.
- If it’s there, re-enable it.
Boom! Your Grammarly tab should pop back up.
4. Internet Connection (Yep, It Matters)
Grammarly needs an internet connection to work. If you’re offline or your connection is shaky, Grammarly might not load at all. Kind of like trying to text without network bars, it just won’t go through.
So, before panicking, ask yourself: Am I connected to Wi-Fi right now?
5. Conflicting Add-ins
If you’ve got other Word add-ins installed, they might be clashing with Grammarly (yep, add-ins can be as moody as people).
Quick Fix Suggestion: Disable other add-ins temporarily and see if Grammarly comes back. If it does, you’ve found the culprit!
6. Still Nothing? Reinstall Might Save the Day
When all else fails, the classic “uninstall and reinstall” usually does the trick. Head to the Grammarly site, download the installer again, and reinstall it fresh. Think of it like giving Grammarly a clean slate to prove itself.
Related content: Is QuillBot Safe?
How do I turn on the Grammarly check in Word?
If you’re anything like me, you probably love the idea of Grammarly catching all those sneaky typos and grammar slips while you’re writing in Microsoft Word. But here’s the million-dollar question:How do you actually turn on the Grammarly check in Word? Don’t worry. I’ve been there too, clicking around Word menus and wondering if I missed something obvious. Let’s walk through it step by step. It’s nice and easy.
Step 1: Make Sure Grammarly Is Installed in Word
First things first, do you actually have the Grammarly add-in installed? (You’d be surprised how many times that’s the issue!)
- Open Word and head to the Home tab.
- Look for the Grammarly tab on the ribbon.
- If you see it, yay! You’re on the right track. If not, you’ll need to download and install Grammarly for Microsoft Word.
Step 2: Log In to Grammarly
Once the tab is there, click on it. You’ll be asked to log in with your Grammarly account. Without signing in, Grammarly just sits quietly in the corner, doing absolutely nothing (and who wants that?).
Step 3: Turn On the Grammarly Check
Here’s the fun part: activating it!
- Inside the Grammarly tab, you’ll see an option like “Open Grammarly” or “Enable Grammarly.”
- Click it, and a panel should open up on the right side of your Word document.
From here, Grammarly starts scanning your text for grammar, spelling, clarity, and tone. You’ll see suggestions pop up in real time, just like magic.
Step 4: Adjust Settings If Needed
Want Grammarly to check more than just basic spelling? Click into the settings (little gear icon) and choose what level of writing feedback you want. You can even customize goals, like making your writing more formal or friendly.
Troubleshooting Grammarly in Microsoft Word: Fix It Like a Pro
Let’s be honest, nothing’s more frustrating than firing up Microsoft Word, only to realize Grammarly isn’t working the way it should.
You know that feeling when you’re about to polish a big report, blog, or assignment, and suddenly… the Grammarly tab is missing? Or worse, it’s there but refuses to respond. Been there, done that! The good news? Most of these issues have quick fixes. Let’s walk through some common problems (and their solutions) together.
1. Grammarly Tab Not Showing Up in Word
Picture this: you open Word, ready to write, but the Grammarly tab is missing. Annoying, right? Here’s how you can fix it:
- Check compatibility: Make sure your Microsoft Office version actually supports Grammarly. Older versions might give you trouble.
- Reinstall Grammarly: Sometimes, a quick reinstall does the trick. Uninstall Grammarly for Word and then reinstall it from the official Grammarly site.
- Enable the add-in manually:Head to Word > File > Options > Add-ins. Check if Grammarly is disabled. If yes, enable it and restart Word.
My suggestion: Always restart Word (or even your computer) after reinstalling; it helps refresh the add-in.
2. Grammarly Not Responding in Word
You’re typing, but Grammarly just stares back at you like it’s on a coffee break. Here’s how to wake it up:
- Check your internet connection: Grammarly needs an active internet connection to work. No Wi-Fi = no suggestions.
- Disable conflicting add-ins: Some other Word add-ins might clash with Grammarly. Try disabling unnecessary ones to see if that fixes the lag.
- Restart Word: Yep, the good old “turn it off and on again” often works here too.
3. Prefer the Old Grammarly Add-In Style?
Some users actually prefer the older version of Grammarly for Word; it’s simpler and lighter. If that’s you, don’t worry. Grammarly still offers a legacy installer. You can download it from their support page and switch back to the older interface.
How to Remove Grammarly from Microsoft Word (Windows)
So, you’ve added Grammarly to Microsoft Word, but now you’ve decided it’s time to say goodbye or maybe just take a break. Don’t worry, removing Grammarly from Word is just as simple as adding it.
I’ll guide you through it step by step so you can clean up your Word and get back to writing distraction-free.
Step 1: Figure Out Which Grammarly You’re Using
Before removing anything, let’s quickly check what you installed:
- If you see a Grammarly tab right at the top of Word, you’re using the Grammarly for Microsoft Word add-in.
- If Grammarly shows up everywhere (Word, Outlook, even WhatsApp Desktop), you’re running the Grammarly for Windows desktop app.
Knowing this will save you from uninstalling the wrong one.
Step 2: Remove the Grammarly Word Add-in
If you only installed Grammarly for Word, here’s how to remove it completely:
1. Close Microsoft Word if it’s open.
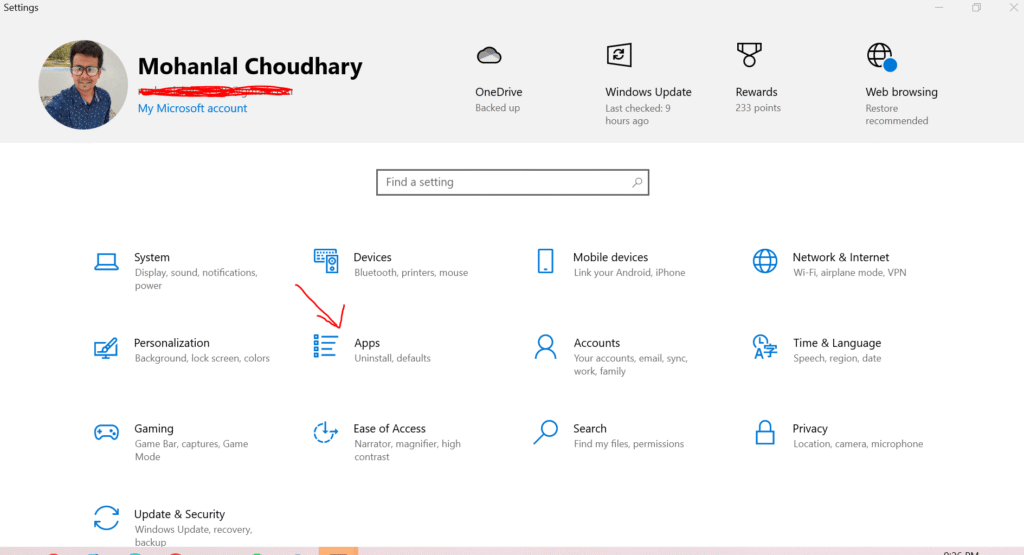
2. Press Windows + I to open Settings.
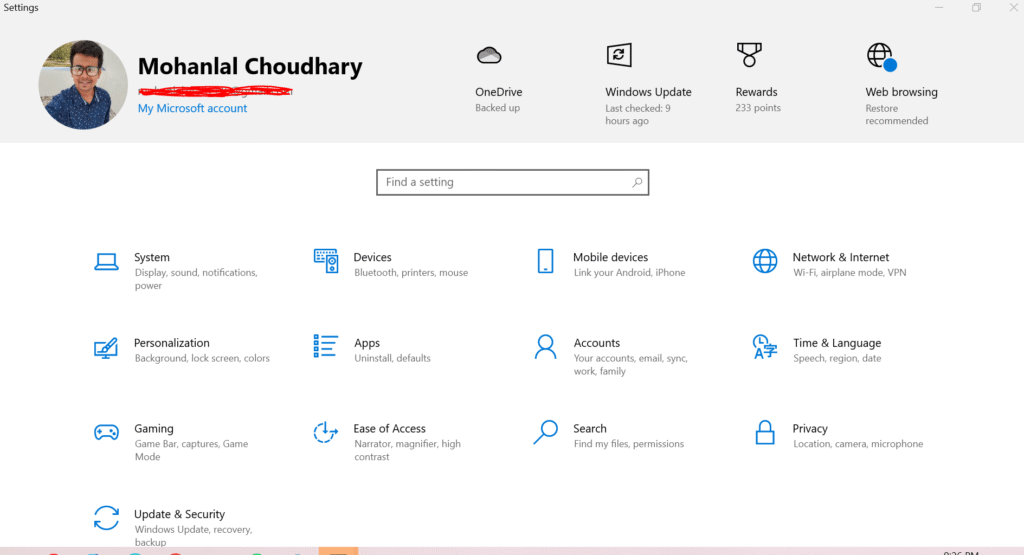
3. Go to Apps -> Installed apps (or Apps & features on older Windows).
4. Type Grammarly in the search bar.
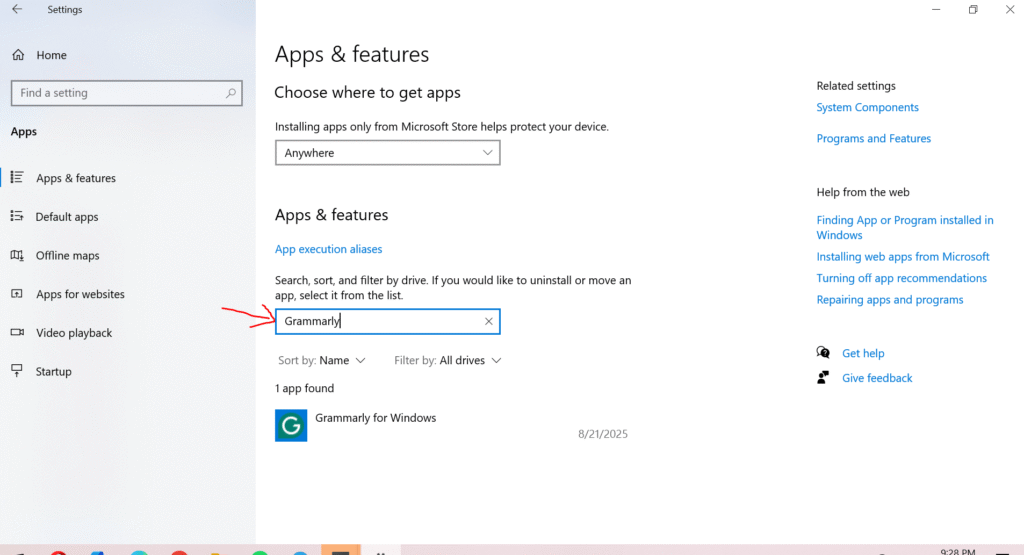
5. Click on Grammarly for Microsoft Office and hit Uninstall.
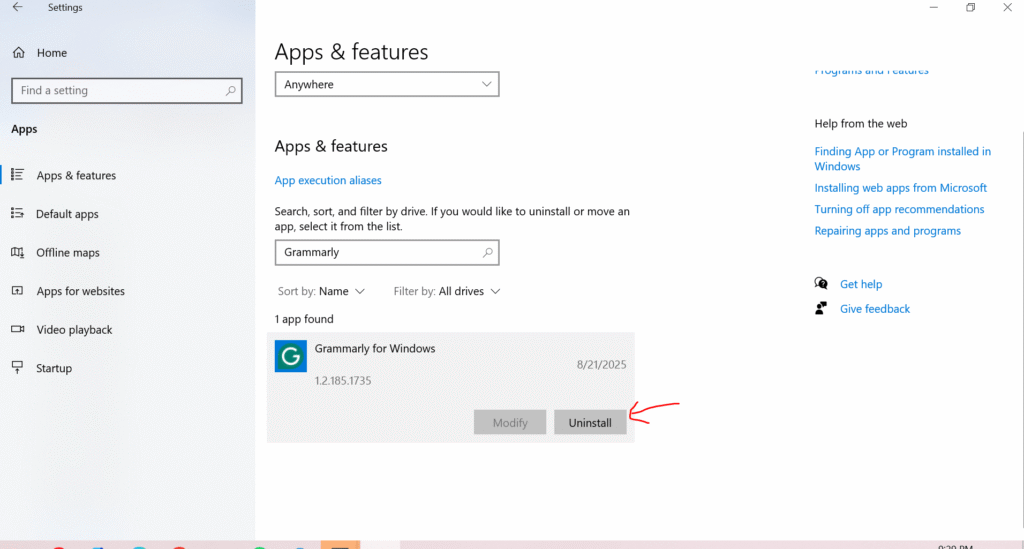
Restart Word, and poof, the Grammarly tab will disappear. Easy, right?
How to Disable Grammarly from Inside Word (Quick Method)?
If you don’t want to uninstall it completely but just want Grammarly to stop showing up:
- Open Word -> click File -> Options.
- Head to Add-ins.
- At the bottom, next to Manage, select COM Add-ins -> click Go…
- Uncheck Grammarly and click OK.
- Restart Word, and Grammarly will stay hidden until you re-enable it.
This way, it’s not gone forever; you can bring it back with just a click.
Removing Grammarly from Microsoft Word is quick and painless. And don’t worry, you can always bring it back later if you change your mind. Just reinstall the add-in or the desktop app, and Grammarly will be right there to catch your mistakes again.
Why You Might Want to Remove Grammarly from Microsoft Word
Grammarly is one of those tools you install and instantly feel smarter about your writing. It catches typos, fixes clumsy grammar, and even suggests ways to make your sentences sound more polished.
But let’s be honest, sometimes the very tool that’s supposed to help can get in the way. If you’ve been wondering whether it’s time to remove Grammarly from Microsoft Word, let’s talk about the most common reasons why you might want to hit that uninstall button.
1. Word Feels Slow or Laggy
Have you ever typed a paragraph in Word, only to notice it freezes for a second or takes forever to catch up with your typing? That’s usually Grammarly working in the background.
When you’re writing a big document, like a long thesis or a detailed client report, then Grammarly scans every single word in real time. The result? Word starts feeling sluggish.
If you’d rather have a smooth, fast writing experience without those little hiccups, removing or disabling Grammarly might be the quick fix you need. Sometimes less really is more.
2. You’re Worried About Privacy (or Just Tired of Distractions)
Grammarly checks your writing by sending it to their servers, where it’s analyzed for grammar and clarity. While Grammarly says your data is safe, I know plenty of people who simply don’t feel comfortable letting sensitive documents like contracts, financial reports, or even personal journals pass through a third-party tool.
And let’s not forget the constant underlines. Red here, green there, blue everywhere. If you’re someone who likes to get ideas down freely before editing, those lines can feel distracting. Removing Grammarly gives you a blank, quiet page again, perfect for focusing on your thoughts without the noise.
3. Grammarly Doesn’t Always Get Along with Other Add-ins
Word is packed with add-ins: citation managers, translation helpers, formatting tools, you name it. The problem? Grammarly sometimes clashes with them. Buttons stop working, features overlap, or Word randomly crashes.
If you rely heavily on other add-ins for school or work, uninstalling Grammarly can actually make your Word setup more stable. Think of it as clearing out the clutter so your must-have tools run smoothly.
4. You Want to Trust Your Own Edits
Here’s the thing: Grammarly is smart, but it’s not you. Sometimes it suggests changing words that you intentionally chose, or it flattens your unique writing style into something more “formal.” That might be fine for a business memo, but not so great if you’re writing a blog post, a novel, or anything creative.
If you enjoy shaping your own voice, removing Grammarly gives you back full control. You can always rely on Word’s built-in editor for basic checks and keep your style completely your own.
FAQs: How to Add Grammarly to Microsoft Word on Windows
To install Grammarly in Word, download the Grammarly for Microsoft Office add-in from Grammarly’s official website, run the installer, and select Microsoft Word. Once installed, you’ll see a new Grammarly tab in Word.
If the Grammarly tab isn’t visible, first check if your Word version is compatible. You may need to restart Word, re-enable the add-in from Word settings, or reinstall Grammarly.
Yes! The Grammarly Office add-in works for both Microsoft Word and Outlook, making it easy to check emails and documents with the same tool.
No, the free version works in Word too. However, Grammarly Premium unlocks advanced suggestions like clarity, tone, and plagiarism checks.
Unfortunately, Grammarly requires an internet connection to function. Without it, suggestions won’t appear in Word.
Grammarly supports most newer versions of Word, including Office 2016, 2019, 2021, and Microsoft 365. Older versions may not be fully supported.
Go to Word Options -> Add-ins -> COM. Add-ins, and uncheck Grammarly. You can also uninstall it completely from your computer’s Control Panel.
This can happen if your internet connection drops or another add-in conflicts with Grammarly. Try disabling other add-ins, restarting Word, or reinstalling Grammarly.
Yes, some users prefer the older interface. Grammarly provides a legacy installer link you can download from their official site.
Yes, Grammarly uses encryption to protect your data. However, always download it directly from Grammarly’s official website to stay secure.